Connect the microscope to load its controls.
The level Ctrl+Left Click jumps to, centred on the cursor — every live view, saved at once on this computer.
Records go to the cloud database, full-resolution pictures to the picture cloud (R2); this computer keeps the working copy of every job.
OFFICIAL types are the ones the PRINTER offers, on every studio computer — an admin ticks them here (one or more); every other type stays here to preview and test.
The same settings as REPORTING’s PRINTER — change them here or there. The label prints once the card’s report is published (REPORTING → PRINTER). In the print dialog pick the NIIMBOT once (Chrome remembers it), paper = the label, margins None, scale Default; it prints black on white and the driver lays the ribbon’s colour where it is black. Fold the label on its dotted line over the top edge of the toploader or the card saver — the side with the grade is the front.
Card stickers (50TH to 999TH) print the customer’s Member# when they have one; 1ST EDITION, LIMITED and UNLIMITED print only for their own ten Member#s. The printer’s OFFSET and TURN 180° above apply here too.
Admins are the two owner accounts only. An agent works the studio of their REGION — SUBMISSION, DASHBOARD, INSPECTION, STAGE/CAM and every customer module — on their own orders and jobs. Granting access needs a real email: BLACKLENS checks the address receives mail, makes the agent’s sign-in (or keeps the one they signed up with) and emails them a link to set their password. Pick a signed-up account from the list as you type, or GRANT AGENT on a user below.
Each agent’s own income account — kept on their agent record, which only the admin and that agent can read. Customers still pay the region’s account (ADMIN → Regional settings).
BLACKLENS’s own accounts for the day customers pay through BLACKLENS — bank accounts, QR payments and card payments. They live in the studio’s cloud settings: only an admin changes them, the studio’s computers can read them, customers cannot. Until checkout runs through BLACKLENS, customers keep paying the region’s account (ADMIN → Regional settings).
An account’s last use is the last time it had BLACKLENS open (phone or computer) — recorded from 28 Oct 2026; ONLINE = within the last 5 minutes. GRANT AGENT fills the invitation above.
Each agent’s orders are charged at their region’s prices — or at the agent’s own price where one is set (AGENT PRICES below); a customer’s request takes the prices of the site it is made on (blacklens.app = Thailand, blacklens.ph = the Philippines) and MY SUBMISSIONS adds them up. Each service may have several tiers (PSA’s Value, Regular, Express …) — + ADD A TIER; MAX DECLARED is the highest card value a tier takes (empty = no limit); ▲ ▼ beside a tier move it — customers see the tiers in this order.
A customer’s card going on to a company is quoted that company’s price plus Pre-grade Standard’s usual price.
How many cards each pre-grade tier and the whole studio take, and the promotion customers see. Limits carry forward until you change them; a promotion belongs to its month. A full tier closes, and customers move up to the next one that has seats.
The studio address and hours show on the customer’s drop-off pass; RETURN BY EMS is added when a customer has the cards sent back; the PromptPay (or e-wallet) ID makes the payment QR with the amount, paid to the account named here.
Our own cards: the Anime category of every search, and new cards no source lists yet. A card’s first published scan lands here by itself and its picture replaces the site’s everywhere. The archive keeps this list short: an archived card works as before everywhere; a card with all a slab label needs moves there by itself after two weeks.
The grade and the BLACKSCORE are apart. Grade: a marked defect adds a tick to its pillar side (corners / edges / surface); a side’s ticks set its defect count on the studio’s table (0.9 ticks = 1 defect · 1.8 = 2 · 2.5 = 3 · 3.1 = 4 …) and every defect takes half a grade off 10 (on the BLACKLENS scale, never above the centering grade + 0.5). BLACKSCORE: the defect takes its minimum + deduction × its box’s share of the card off the side’s points, so every tick costs at least its minimum — a box covering 2% of the card as a MAJOR with minimum 10 and deduction 3000 = 10 + 0.02 × 3000 = −70. A score set by hand in DEFECT MARKS stays as it was set.
New inspections use the saved figures at once; a published report keeps its own until APPLY. APPLY recomputes every published report with the saved figures: grades, BLACKSCORE, the score sheet and each mark’s deduction. Reports from before 9 Oct 2026 have no box size — a mark’s size is taken from its own measurement (length × width), and a mark without one takes only its minimum. PREVIEW shows what the figures in the fields would do, and changes nothing.
Checking…
Every submission and every status change (checked in · inspecting · reports ready · returned, and a SUB#’s submitted · grades in) emails the customer from admin@blacklens.app, once each. The key, the sender and the test-phase hidden copy are set in Vercel — DEPLOY.md § I.

| ATTRIBUTE | DESCRIPTION |
|---|---|
| — | |
No camera running.
Turn the camera ON in the Camera card below and it appears here.
Optional. The jig: five cards as a staircase on the tray, each step 10 mm on from THE PLANE. Check each position with GO (the Live View shows it), then press START: the stage photographs THE PLANE and the five steps, moving 8 mm along each to measure its height. Run it once, and again only when the camera, lens or focus moves.
| MACHINE | WORK | |
|---|---|---|
| X | — | — |
| Y | — | — |
| Z | — | — |

The pictures use sample customers, cards and prices.
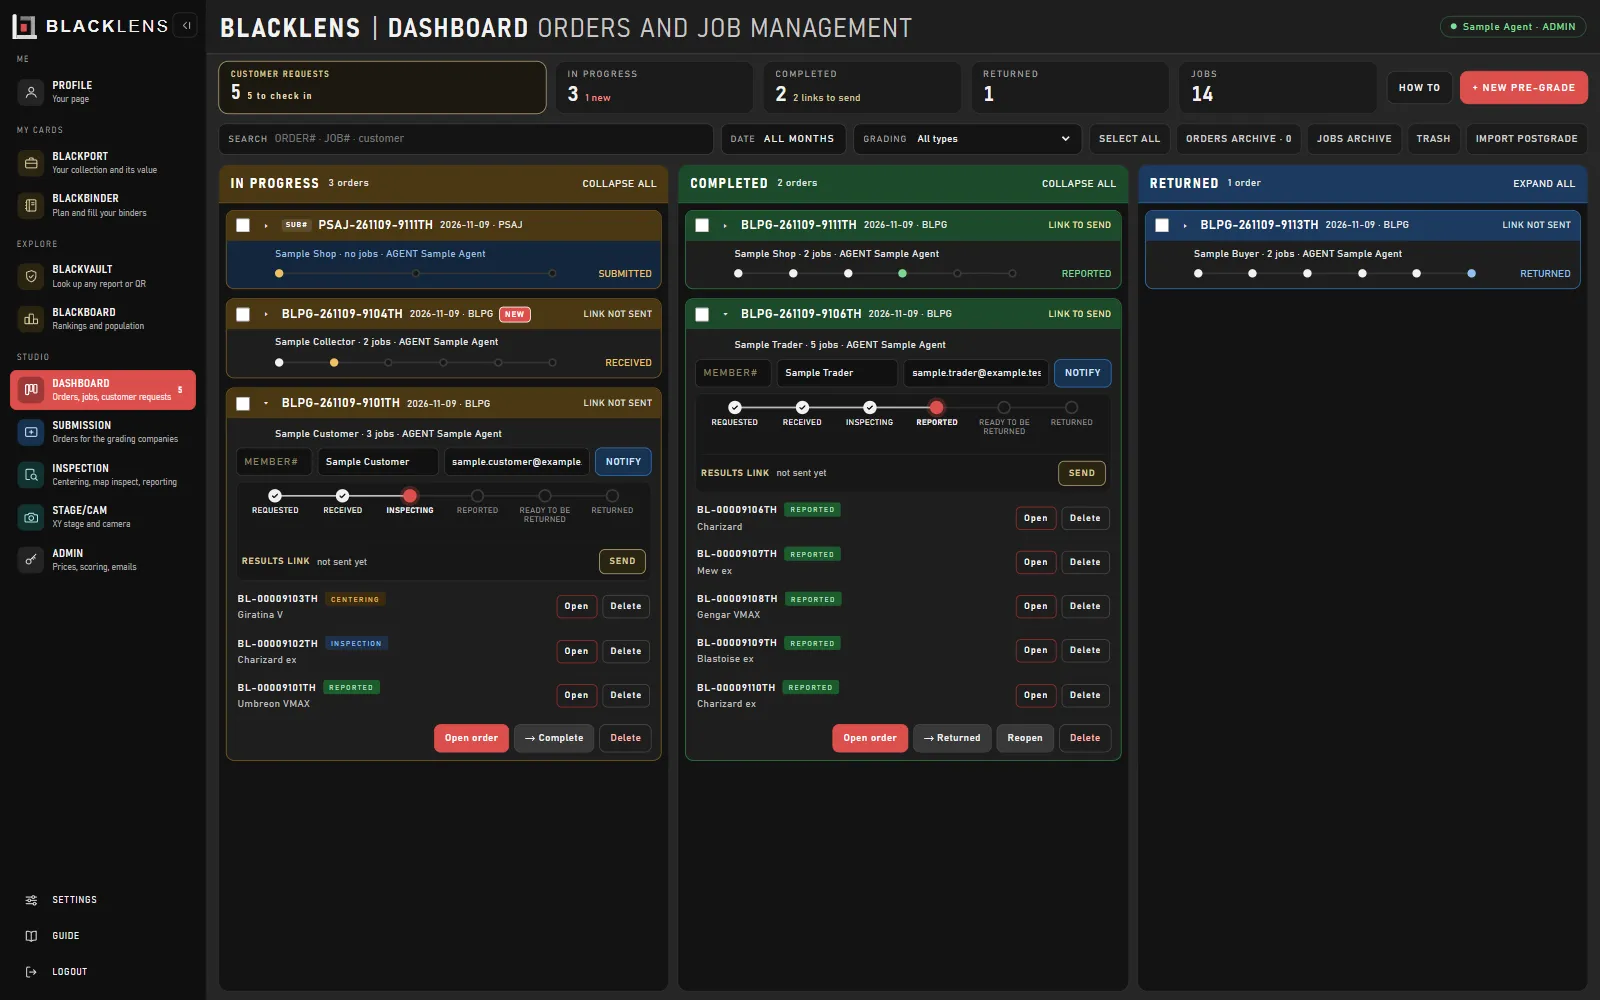
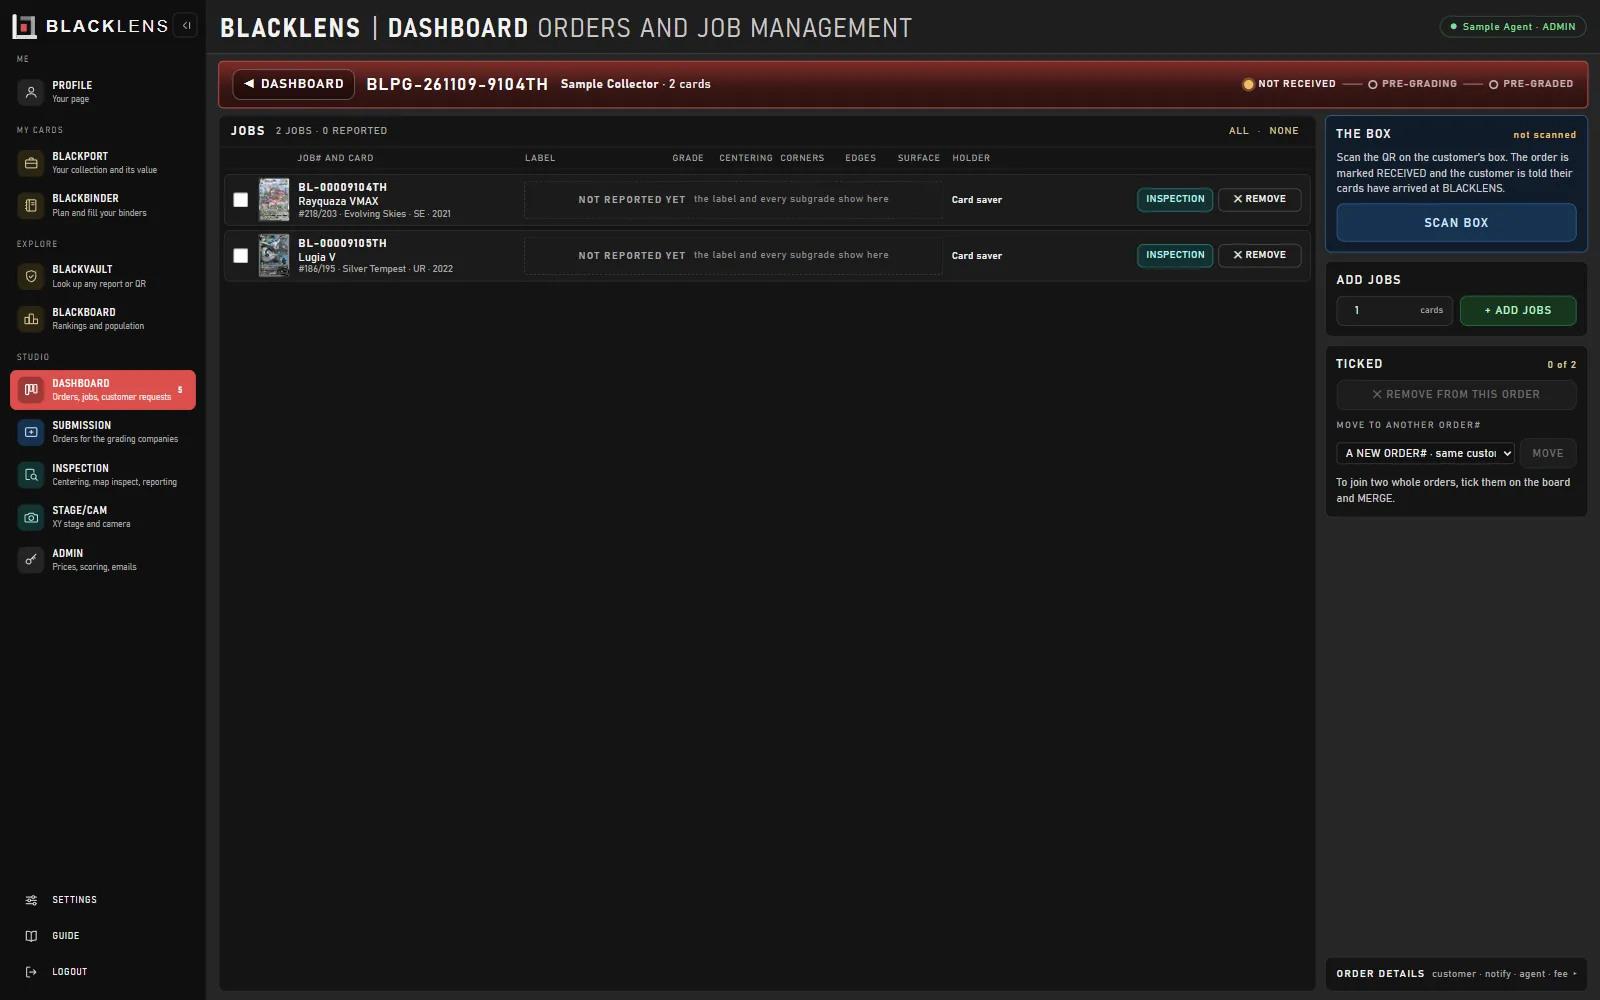
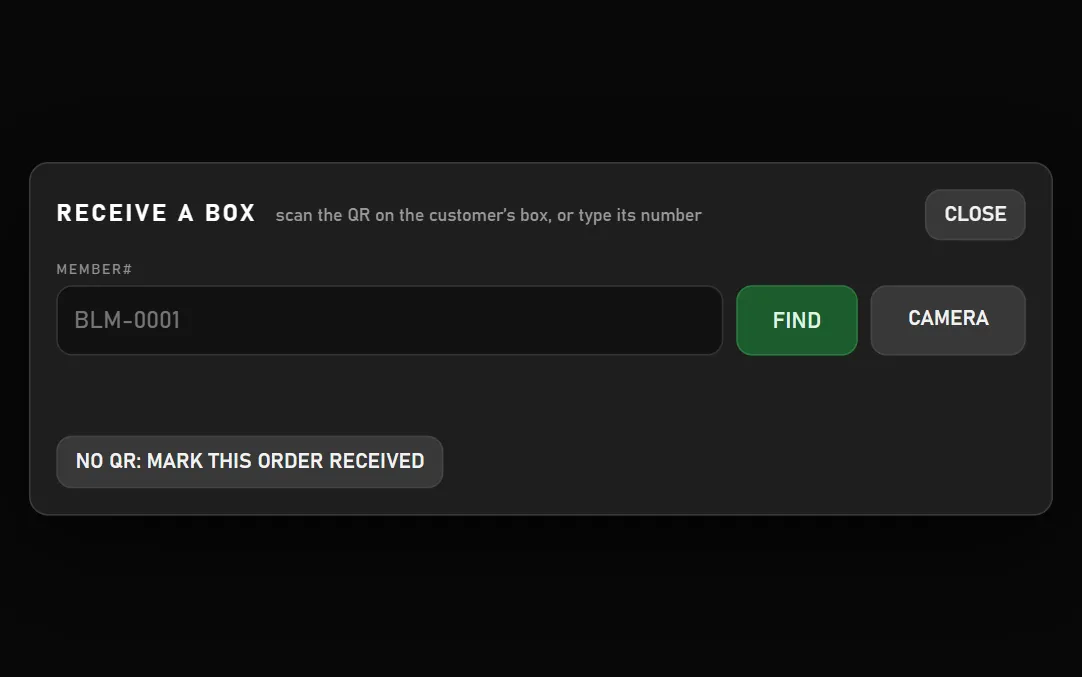
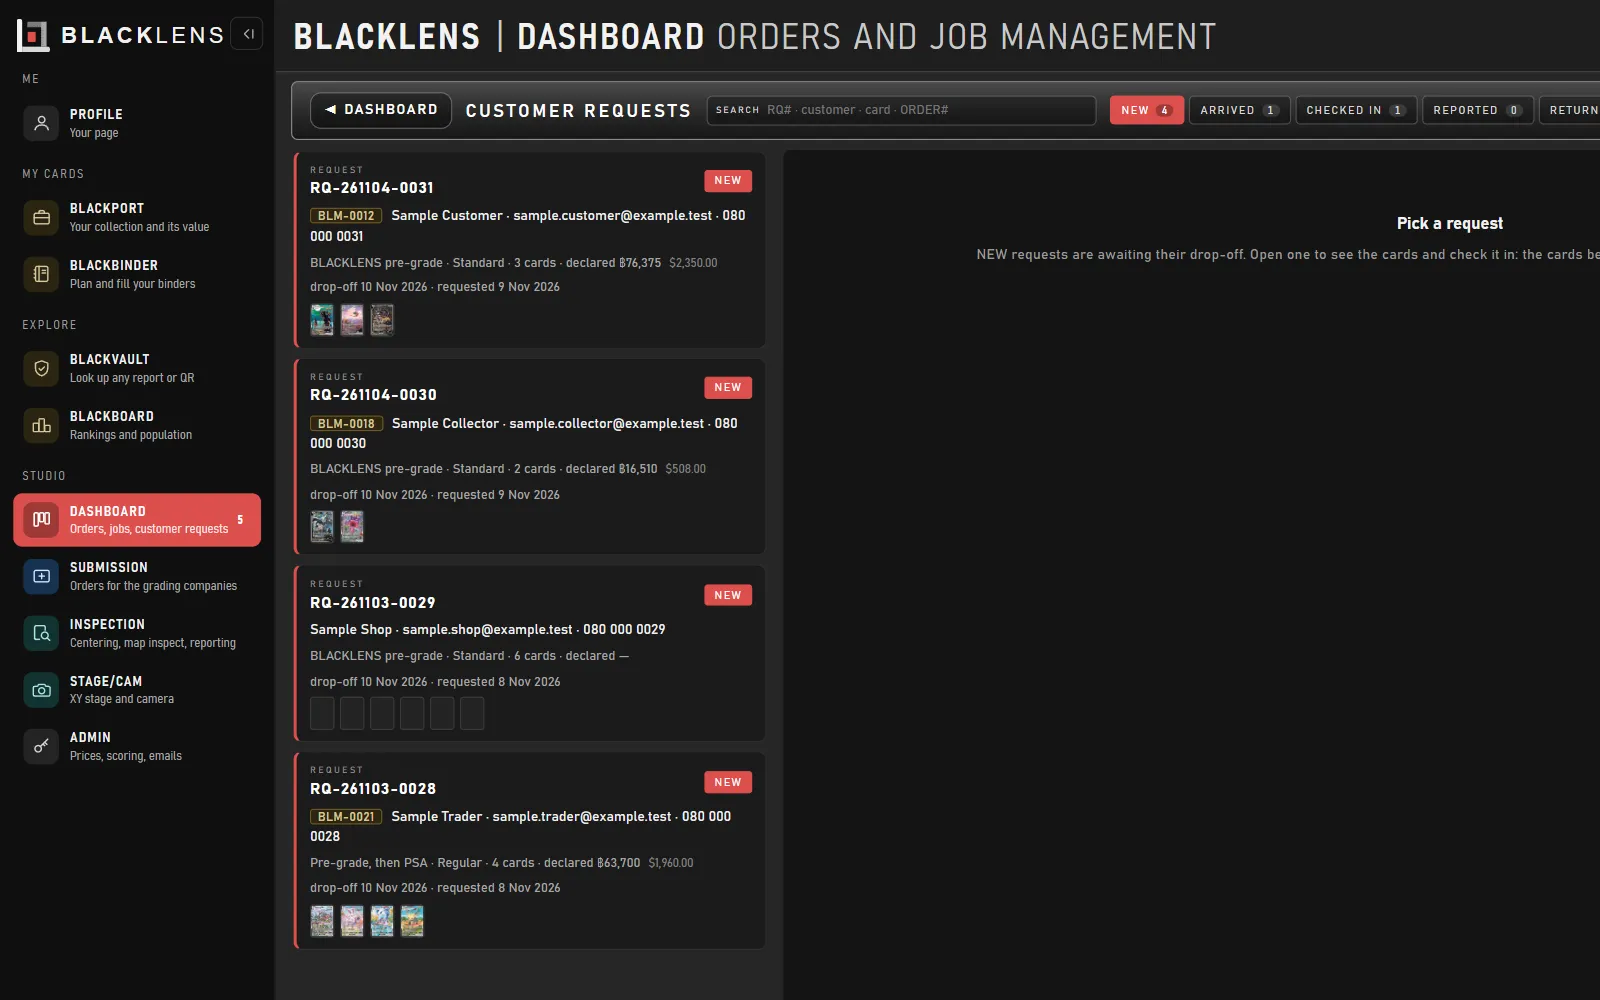
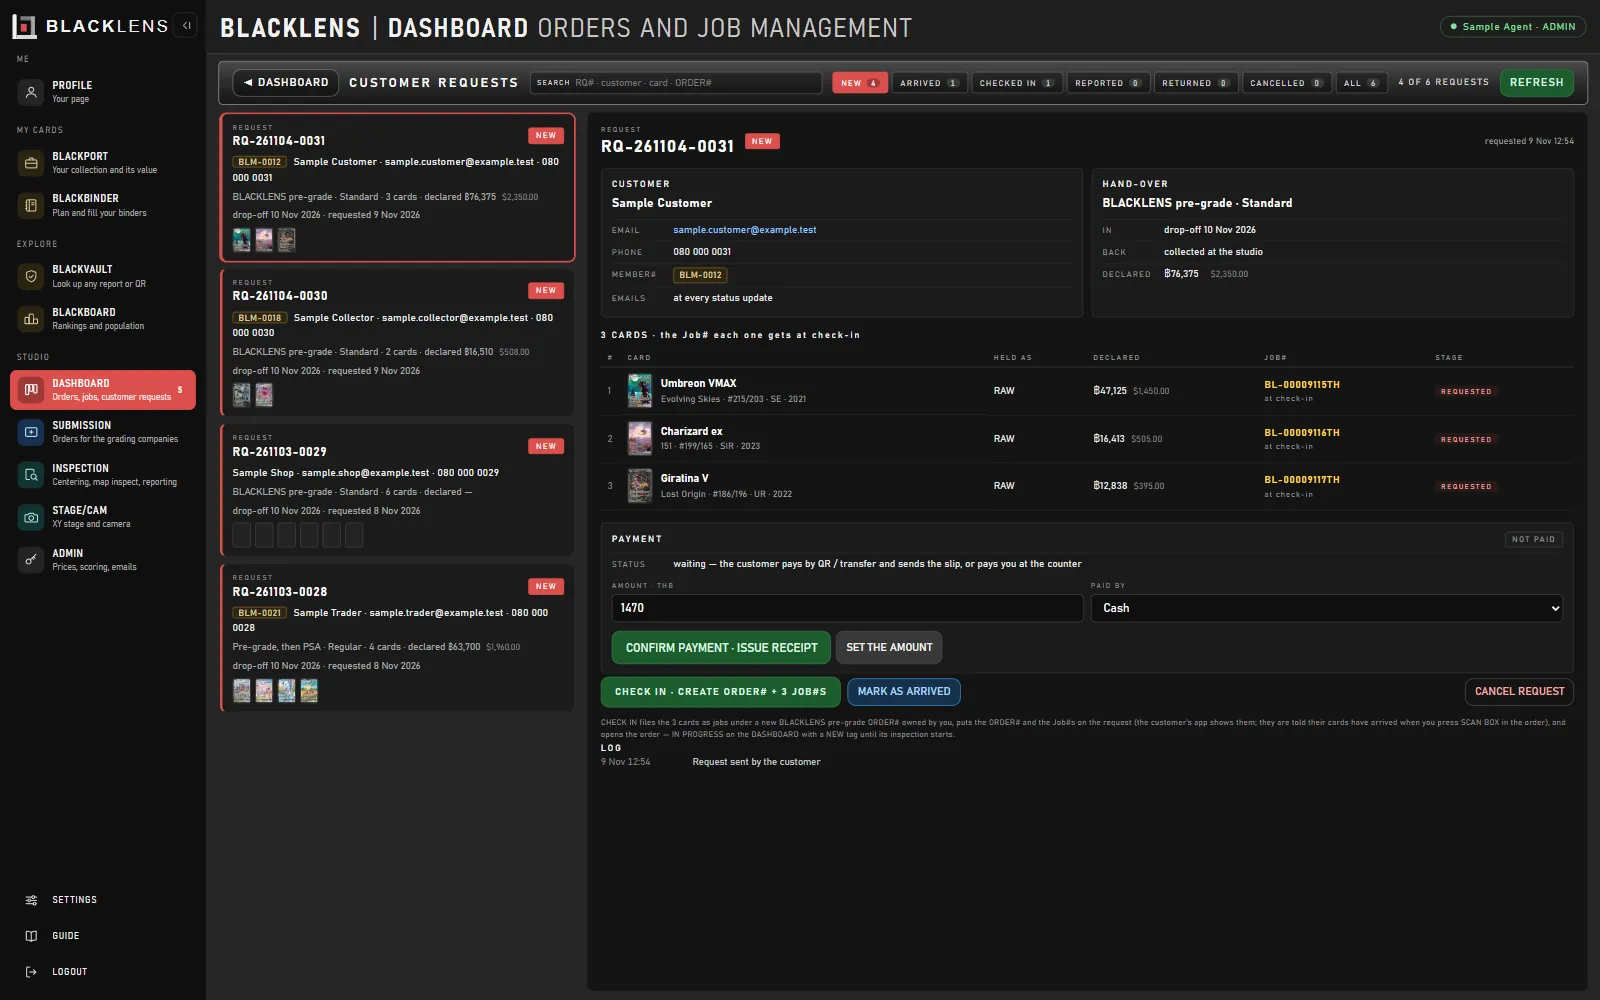
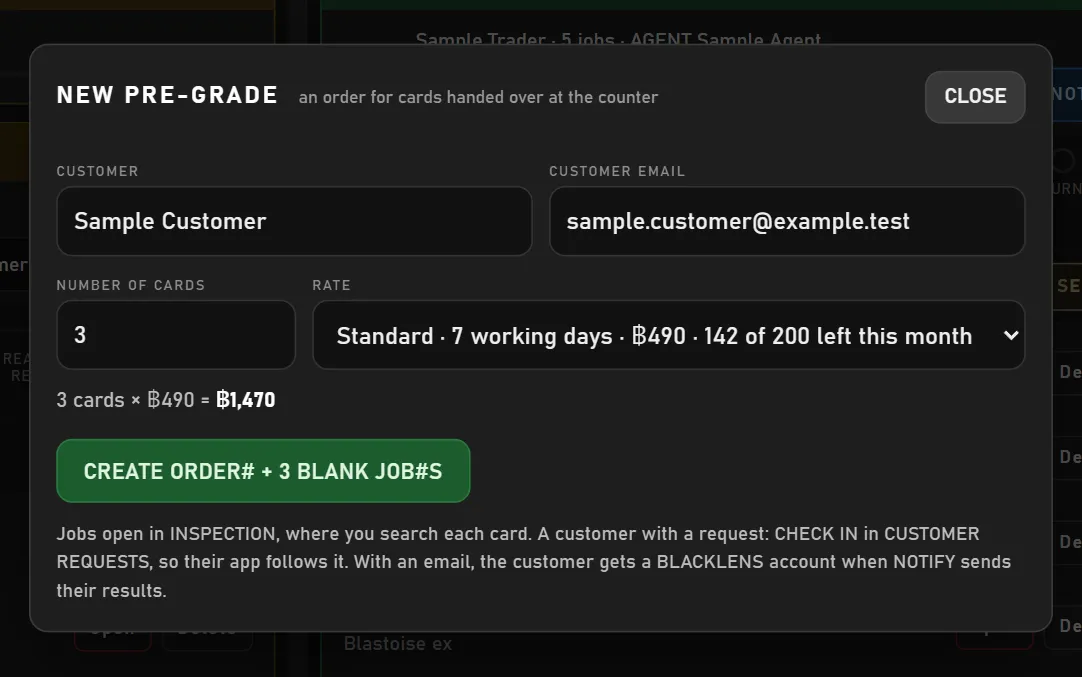
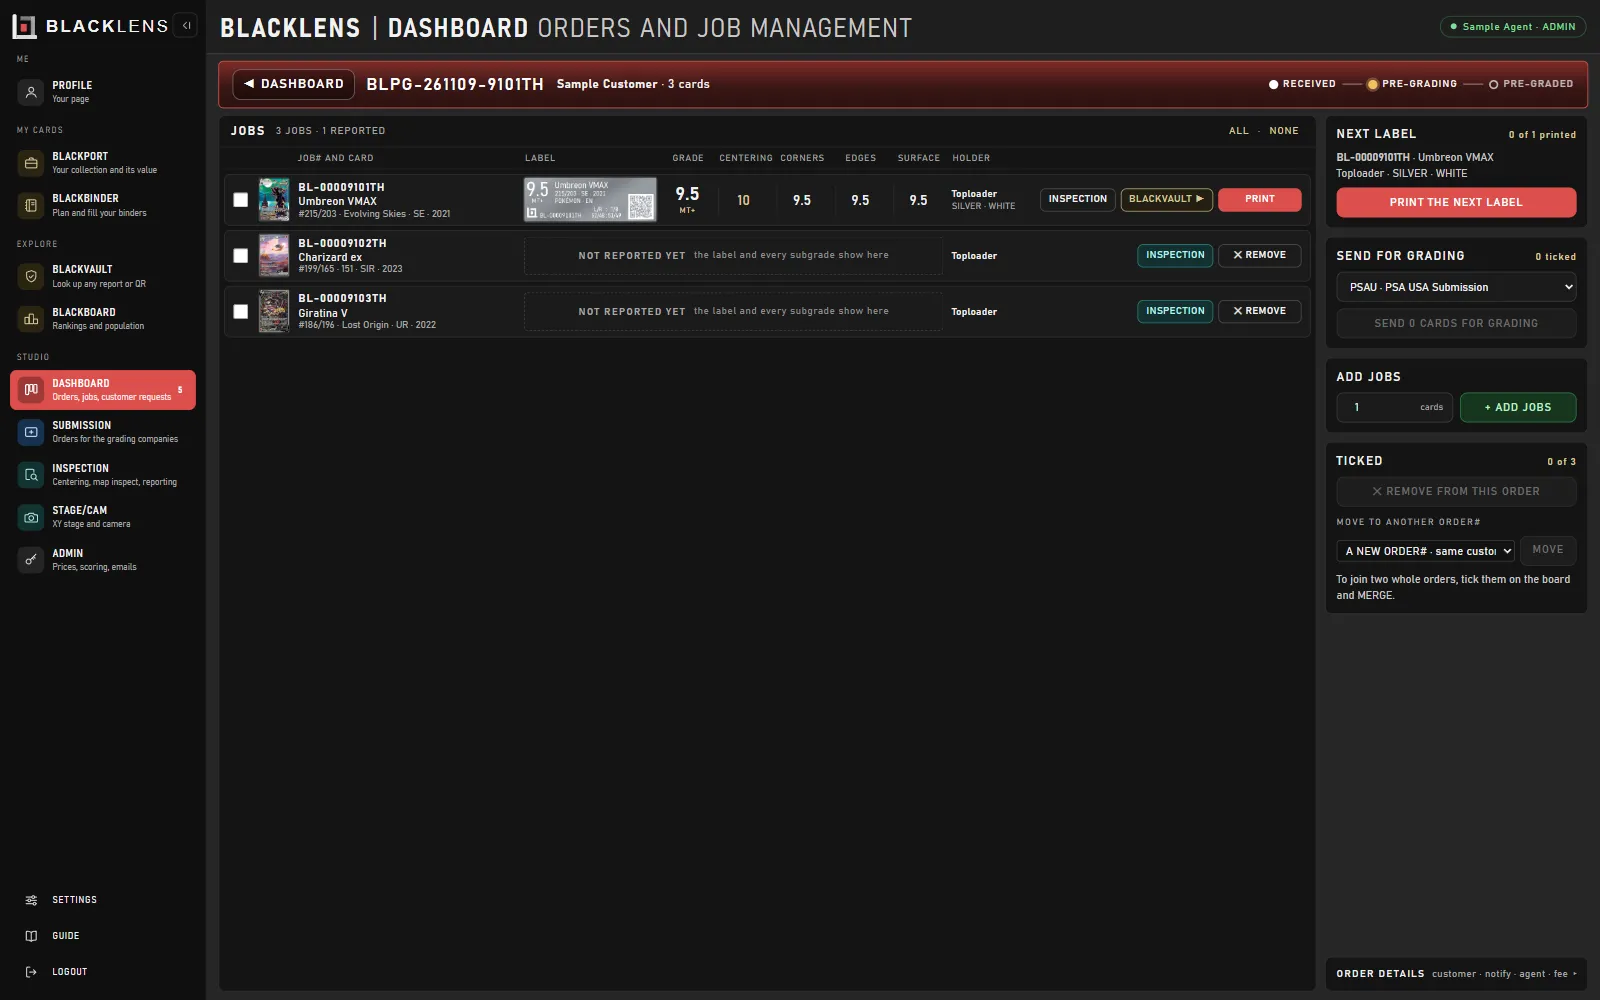
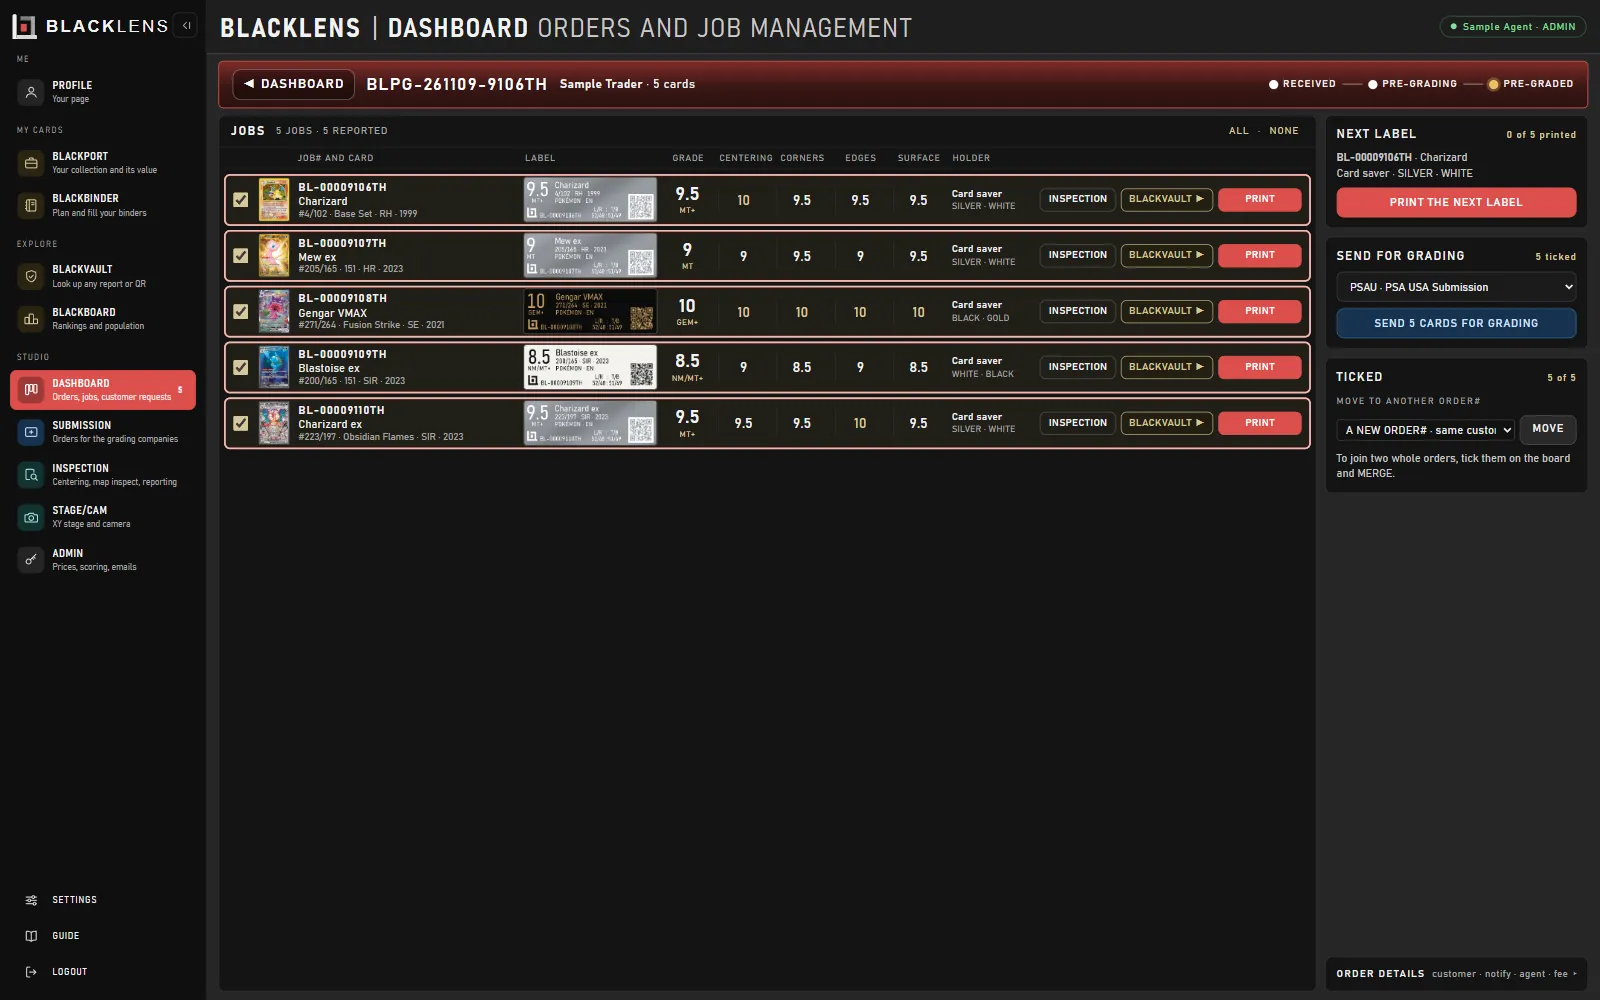
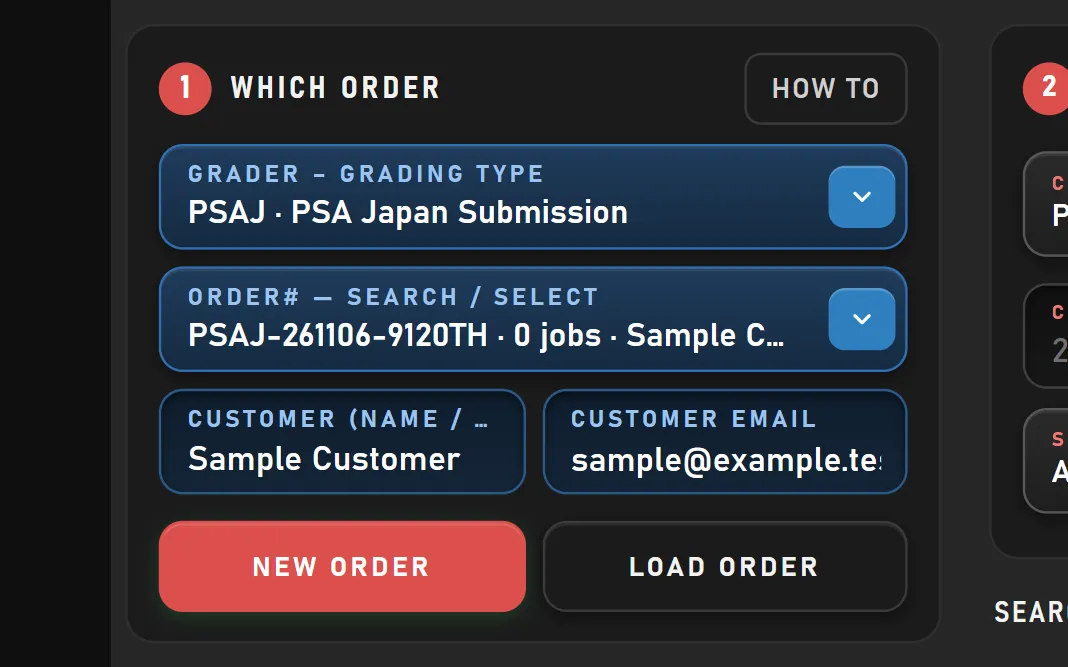
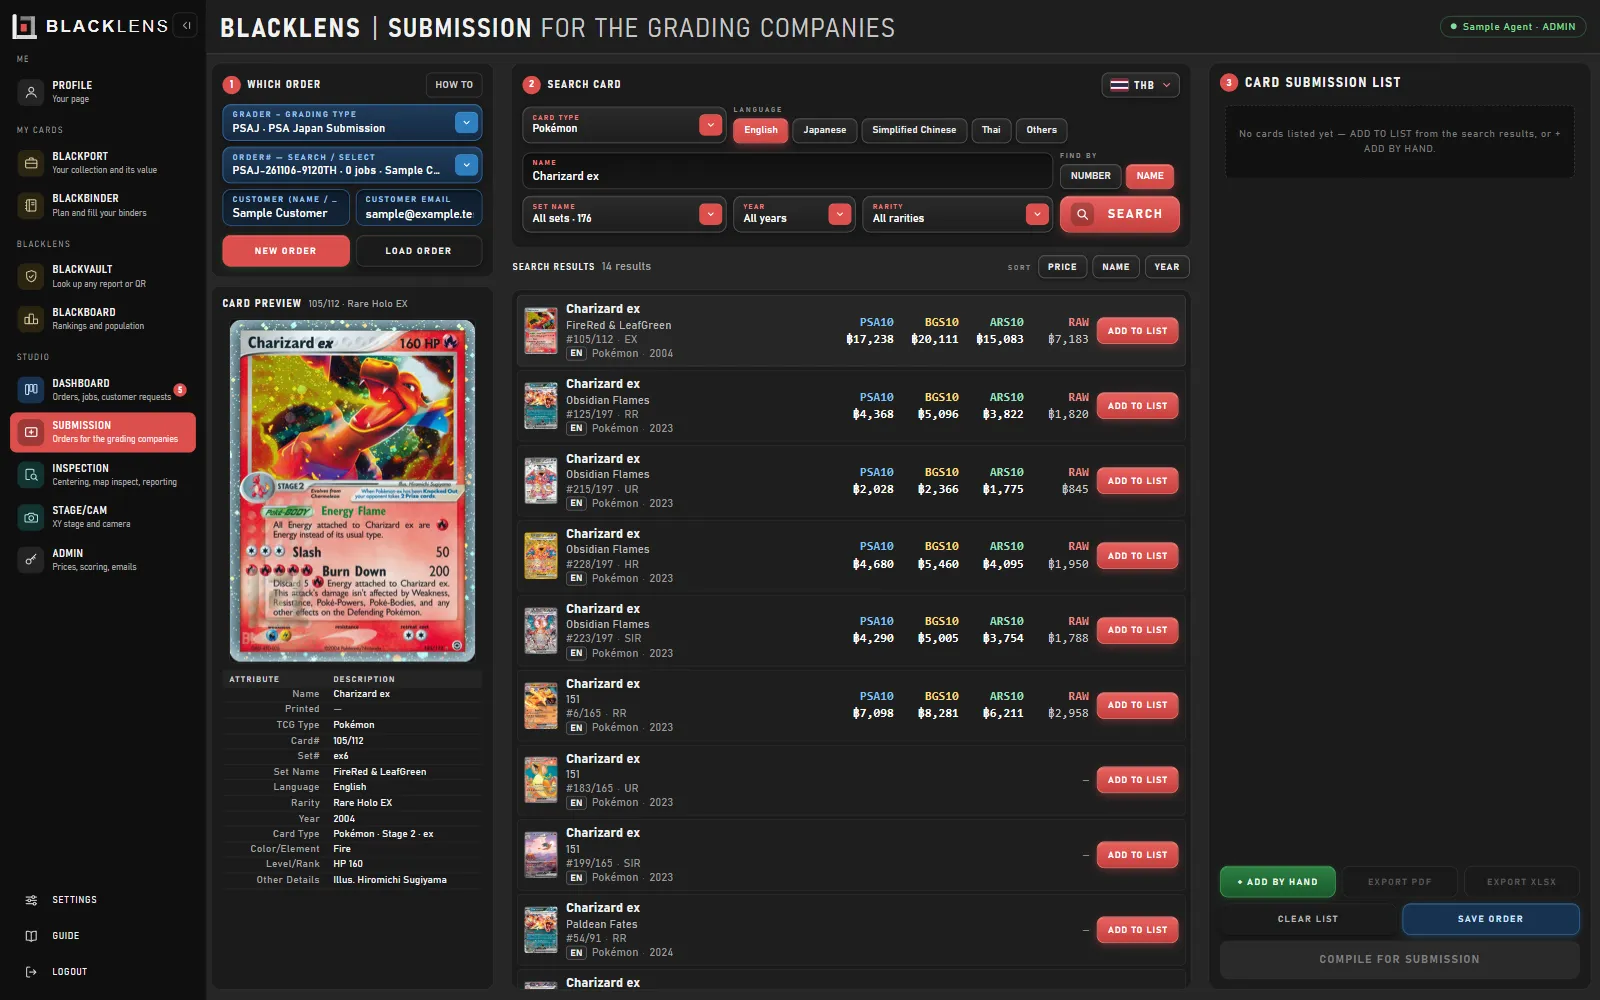
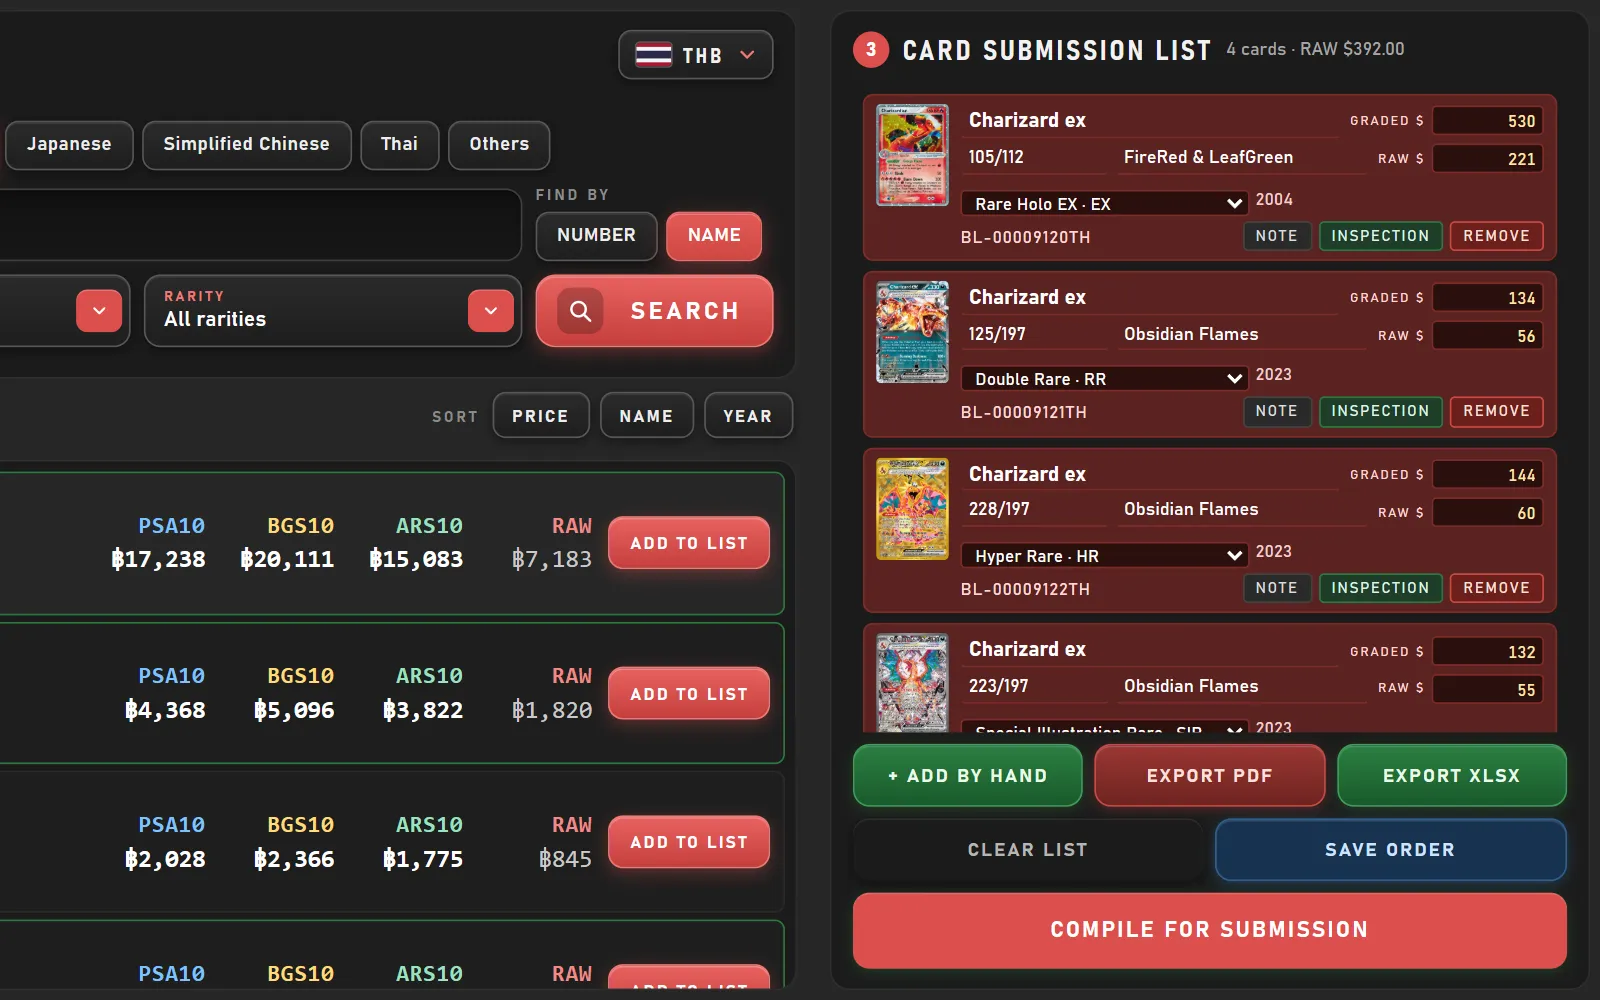
Find each card, list it and COMPILE: the order gets its ORDER#, every card its own Job#. A customer’s request is checked in by its RQ#.
Every order on one board — IN PROGRESS · COMPLETED · RETURNED — with its customer, each card’s status and its SUB#s.
INSPECTION 1. The stage scans each side; two frames find the four borders: the ratios, the centering score, the companies’ grades.
INSPECTION 2. The live microscope view: box every defect MAJOR, MINOR or MICRO — its minimum and its share of the card set the deduction, its ticks the grade.
INSPECTION 3. Check the report and PUBLISH: the card opens in BLACKVAULT by its slab’s QR and joins BLACKBOARD.
Optional. A SUB# sends chosen cards on to PSA · BGS · CGC · ARS; their grades come back by the POSTGRADE import.
The order moves to RETURNED, then to the ORDERS ARCHIVE. The customer was emailed at every step.
The customer follows the same journey in BLACKLENS, and every step reaches them by email from admin@blacklens.app.
| Admin | Everything, SETTINGS and every delete included. |
| Agent | SUBMISSION · DASHBOARD · INSPECTION · STAGE/CAM · BLACKBOARD · BLACKVAULT · GUIDE — their own orders, never a delete. |
| Customer | BLACKBOARD · BLACKPORT · MY SUBMISSIONS · their own SETTINGS — read-only everywhere else. |
| Visitor | BLACKVAULT by a Job# or the slab’s QR. |
On a phone every role gets the mobile app (Vault · Board · Submission · Portfolio · Account); the studio pages open on a computer.
- STAGE/CAM — the stage service answers (it starts with Windows once stage/setup-autostart.bat has run); Connect Stage, then Home X&Y.
- Camera ON — it always starts OFF.
- Scale — the badge beside the 16 / 36 / 42 SHOT buttons reads PASS for the pattern in use; on RECAL or FAIL press that pattern’s button.
The number printed on the card — 149/128, OP05-119, SUDA-JP049. A set code alone (sv3, OP06, SUDA-AE) lists the set.
In English or as printed (ブラッキー). SET NAME, YEAR and RARITY narrow it; scroll for more results.
Drop, paste or pick a photo: the card’s number is read off it and searched.
PSA 10 and RAW from the market beside every result; SORT by price, name or year.
- GRADER – GRADING TYPE, then NEW ORDER or an ORDER#; the customer and their email. SUBMISSION is for the grading companies: a pre-grade starts on the DASHBOARD.
- ADD TO LIST — every press is one copy. Edit name, number, set, rarity and the declared value (USD) in the list; NOTE for anything to remember.
- COMPILE FOR SUBMISSION — the cards become jobs, a Job# each. SAVE ORDER keeps an unfinished list.
- EXPORT PDF — the submission sheet; EXPORT XLSX — the POSTGRADE template.
- The customer sends a request from SUBMISSION, with their cards or just the number of cards, and brings or posts them.
- SCAN BOX — open the order: the QR on the customer’s box marks it RECEIVED and tells them their cards have arrived.
- CHECK IN — the request gets its ORDER# and Job#s; from then on each card’s stage reaches the customer by itself.
- An ORDER# with that many blank Job#s goes on their account. Search each card when you open it in INSPECTION.
- NEW PRE-GRADE — the same for cards handed over at the counter, with no account.
IN PROGRESS → COMPLETED → RETURNED. Drag a card, or it moves itself when every job is reported, then returned.
Every job with its status, INSPECTION and VAULT; the customer, by their BLM#. The customer is emailed on their own as the order moves.
Tick jobs → SEND FOR GRADING (PSA · BGS · CGC · ARS); POSTGRADE records each grade and cert#.
A grade on a SUB#, typed or imported, is kept under its Job#, marked VERIFIED, and compared on the customer’s GRADED page and on BLACKBOARD. A customer can add a cert of their own on GRADED.
Open the order, tick the jobs, pick an ORDER# or a new one under MOVE TO ANOTHER ORDER#, then MOVE.
Type the customer's BLM# (BLM-0012) and press Enter: their name and email come from their account, and the order reads VERIFIED.
SEARCH · DATE · GRADING; tick orders to move or MERGE them; ORDERS ARCHIVE · JOBS ARCHIVE · IMPORT POSTGRADE; TRASH keeps deleted jobs 30 days.
- Connect Stage (the port is chosen on STAGE/CAM), Home X&Y, camera ON.
- Pick the sequence — 16, 36 or 42 shots. Its scale must read PASS (see Before the first card).
- Card face up → Run + Capture → the tiles stitch into one picture → Use FRONT.
- Flip the card → Run + Capture → Use BACK.
OUTER (cyan) on the card’s cut edge, INNER (yellow) on the printed border. Drag an edge or a corner; a selected frame moves 1 px with the arrow keys.
Auto Align Image levels the card; Auto Centering snaps both frames onto it. Fine rotation sits under the window.
Both read the archive: every published report and every Report pressed here teaches the printed border of that card, set and TCG (as a share of the card), the card’s size, and how far you moved the frames after the last Auto Centering. A run picks the border the records agree with, re-finds an edge that makes the card the wrong size, and follows a steady hand correction. The message says what it learned from — press Report once the frames sit right and the next card does better.
TEMPERATURE and TINT warm / cool and green / magenta the picture before the tone sliders. DOWNLOAD saves this side as a CENTERING summary: the whole card with its frames, the four widths, L/R · T/B · SCORE and the grades, with the BLACKLENS mark in the card’s bottom-left corner. Its MARKET VALUE is the RAW value the app shows, or what you type in EST. VALUE (the currency in SETTINGS); its CONDITIONAL VALUE is that × the BLACKLENS grade: 10 ×1.1 · 9.5 ×1.05 · 9 ×1 · 8.5 ×0.9 · 8 ×0.8 · 7.5 ×0.75, below that the grade ÷ 10.
Rings every 0.5 mm in from the outer frame. Zoomed in, click the ring that sits on the border on each axis, switch the grid off — the inner frame takes those insets.
L/R and T/B per side as whole numbers that add to 100. Score = 100 − ⌈|L−50|⌉ − ⌈|T−50|⌉ per side, with the grading companies’ centering grades from the same ratios.
Makes each side’s picture for the database (the card inside a thin mat ring); the four corners are measured then.
A larger window with the image modes (B&W, ULTRA-V, INFRA-R, SCRATCH …) and adjustments; Apply to Result keeps the processed picture. ESC leaves.
FRONT centering → FRONT full-map inspection → flip the card → BACK centering → BACK full-map inspection → reporting. The strip under the results walks it: BACK and NEXT name the step they open, a step number jumps there. CENTERING runs the live view at 4K, MAP INSPECT at 1080p — the camera switches by itself, a size picked by hand holds for that step while the job is open.
SCOPE ON, the live resolution 1080p / 2K / 4K, GRID. A defect still is always taken at 4K, whatever the live view runs at; FREEZE holds a 4K still to tune the filters and mark on.
The Expert modes, drawn on the graphics card on every frame (the corner of the live view reads the stream and its frame rate): ULTRA-V and INFRA-R for print and gloss, SCRATCH for fine lines. IMAGE ADJUSTMENT under the map tunes them; RESET returns to the Expert presets.
FULL CARD DEFECT MAP shows the side’s card with a red box where the camera is looking (it follows the stage) and every mark as a square loupe with its number below. FRONT / BACK flips the side, DEFECTS SHOW / HIDE the loupes.
The pad steers the view: hold = glide, tap = one step. Numpad 1–9 the same, Esc stops. A USB game controller does it too — its stick moves the stage, and JOYSTICK › SETUP gives each of its buttons a job: stage, positions P1–P4 (tap = go, hold 1.5 s = save here), macros or MAP INSPECT marks.
The stick has three levels: centre = stop, half-way = half the FEED, all the way = the FEED (600 mm/min to start). FEED − / FEED + (on the card or a controller button) change it by 100, from 100 to 800. The stage stops the moment the stick is let go — and whenever the BLACKLENS window loses the focus.
The controller reads as an Xbox pad, so Steam and the Xbox Game Bar answer some of its buttons themselves and take the focus (the stage stops). Turn that off once: Steam › Settings › Controller — Guide button focuses Steam OFF, Xbox configuration support OFF; Windows Settings › Gaming › Xbox Game Bar — ‘Open Xbox Game Bar using this button on a controller’ OFF. Or give that action to another button in SETUP.
- Left-drag a tight box around it — the box is the defect’s size: its severity’s minimum plus its share of the card sets the BLACKSCORE deduction. The DEFECT LOUPE under the map shows it square, up to 250%.
- DEFECT TYPE: pick the type. The map places the mark from the stage position — CORNERS within 10 mm of a corner, EDGES within 4 mm of an edge, SURFACE elsewhere (the dashed grid on the map); a mark taken without a stage position is kept but not counted — box it again with the STAGE on.
- MAJOR · MINOR · MICRO (keys 1 · 2 · 3) files it in DEFECT MARKS. A click on a row shows it in the DEFECT LOUPE; a click on its MAJOR / MINOR / MICRO pill changes the severity (each choice shows what it would take); a picked row shows EDIT in its top-right corner — type the points it takes from the BLACKSCORE (a whole number; the tick stays the severity’s; AUTO puts back the box’s score), then publish again; a reported job opened on another computer brings its published marks back here so its report can be revised; UNDO LAST · DELETE · CLEAR SIDE sit under the list.
A click on a mark (in the list or on the map) drives the stage there. RECORDING: Record + Run Macro films a side along the sequence; Play shows the take in the map window.
The card is off the stage? Map the defect by hand on the FULL CARD DEFECT MAP: Ctrl + click puts a 2 × 2 mm box on the spot, Ctrl + drag draws the box’s size; pick its TYPE and MAJOR · MINOR · MICRO as above. No camera or stage is needed — the picture comes from the side’s stitched capture, the zone and the size from its CENTERING frame. The row’s picture reads MAP.
The red figure in each pillar card’s head is its points left. The card reads like the CENTERING card. Under the head the front and the back side by side, each a strip: the side’s points (to one decimal, rounded down) and its grade in the red-edged box, the MAJOR · MINOR · MICRO counts (hover one for its area and points), then AREA — the side’s whole defect area and its share of the card — with the points taken; last, each company’s grade for the pillar. The total grade sits in the GRADE pill above; the corner and edge pictures show in 3 · REPORTING.
CENTERING 280 (front 160 · back 120) · CORNERS 220 (120 · 100) · EDGES 220 (120 · 100) · SURFACE 280 (160 · 120); a side’s centering score out of 100 counts ×1.6 on the front, ×1.2 on the back. The BLACKSCORE and the grade are apart: a mark takes its minimum (MAJOR 10 · MINOR 5 · MICRO 1) plus MAJOR 3000 · MINOR 2000 · MICRO 1000 × its box’s share of the card off the points, both set in ADMIN (a box covering 2% of the card as a MAJOR = 10 + 0.02 × 3000 = −70), and never touches the grade. BLACKSCORE = the points summed, rounded to a whole number; the GRADE never passes the centering grade + 0.5 (centering 9 → at most 9.5).
Ticks (SETTINGS: MAJOR, MINOR, MICRO) add up per pillar side and set its defect count on the studio’s table: 0.9 = 1 · 1.8 = 2 · 2.5 = 3 · 3.1 = 4 · 4 = 5 · 4.9 = 6 · 5.8 = 7 · 6.7 = 8 · 7.6 = 9 · 8.5 = 10 · 10 = 11 · 10.9 = 12 · 11.8 = 13 · 12.7 = 14 · 13.6 = 15 · 14.5 = 16 · 16 = 17 · 16.9 = 18; every defect takes half a grade (0 = 10, 1 = 9.5 … 17 = 1.5, 18 or more = 1), each company’s grade follows CALC’s totals, and BLACKLENS grades on its own scale. A pillar grade shows rounded down to the half (surface 9.7 reads 9.5; the 9.7 counts in the totals). SETTINGS (admin) holds the ticks and deductions.
On the FRONT, NEXT · FLIP THE CARD opens the BACK’s centering; on the BACK, NEXT · PUBLISH publishes the report and opens REPORTING.
The report exactly as the customer will see it — PREVIEW · NOT PUBLISHED.
Puts it online. After any change: REBUILD & REPUBLISH. PRINT A4 prints the three-page document.
Check it as a customer sees it.
Admins and agents: PRINTER on this bar opens the NIIMBOT M2 label printer — the 40 × 60 mm label, every line in Bahnschrift SemiLight SemiCondensed. It offers the official labels alone: TL · YU-GI-OH (fold 15 / 25) for Yu-Gi-Oh cards and TL · OTHER TCG (fold 11 / 29) for every other card fold over a toploader’s top edge — the PRINTER takes the one for the card’s game; CS · ANY CARD (fold 20 / 20) folds over a card saver: the grade, the card, the Job#, the centering and a QR on the front; the subgrades and BLACKSCORE on the back.
SETTINGS → Label printer lists every type — CS FOR ALL (fold 25 / 15), TL FOR ALL (fold 9.6 / 50.4, upright), CS QR FRONT (fold 50.4 / 9.6, the QR on the front) and each new one — to preview and test; an admin ticks which are OFFICIAL, and the PRINTER on every studio computer offers those. Previewed as it comes out; the colour, offset and copies stay on this computer; PRINT LABEL once the report is published.
blacklens.app/vault/<Job#> — the slab’s QR opens it; anyone can look a card up by its Job#.
SUMMARY · CENTERING · CORNERS · EDGES · SURFACE. Every picture zooms (wheel, pinch, double-tap); DEFECT MARKS ON/OFF on the surface map; A4 REPORT.
Name · card# · year · set · language (and the rarity of a variant sharing its number).
The grade distribution, GEM RATE (the 10s against every card graded), the average pillar grades and the leaderboard by BLACKSCORE.
A card’s PUBLISHED REPORTS · REMOVE takes a stray report down.
- DASHBOARD → the order → tick the cards → CREATE SUB# FOR GRADING.
- EXPORT TEMPLATE; when the cards come back, fill GRADE and CERT# against each Job#.
- IMPORT GRADES (or the bar’s IMPORT POSTGRADE) → check the preview → APPLY. A SUB# with every grade moves to COMPLETED and the customer is emailed the grades.
Anyone can register on the sign-in page and becomes a customer. Staff accounts are made by the admin.
Customers never change or delete a record, a report or a job — only their own portfolio and requests.
YOUR ACCOUNT — username, currency, hide values, notifications — the same on the phone’s ACCOUNT tab.
- Service — the BLACKLENS pre-grade, or pre-grade then PSA · BGS · CGC · ARS.
- Cards — from the portfolio or a search, each with a declared value.
- Hand-over — drop-off or courier, collect or courier back, a contact.
- Review → SUBMIT REQUEST → the pass (RQ# + QR) for the drop-off.
- After the check-in: the ORDER#, each card’s stage, OPEN THE REPORT once published.
Submitted · checked in · inspecting · reports ready · returned — and for walk-in orders and SUB#s too.
An order emails the customer on its own as it moves (checked in, inspecting, reports ready, returned); each order’s rail shows what went and when. A customer can switch status emails off (SETTINGS → Notifications, or per order).
DEPLOY.md section I; ADMIN → Customer emails sends a test.
Their cards with grade and price paid (one by one, or a batch’s price divided by value), today’s value, the unrealized gain and price trends.
blacklens.app on a phone: Vault · Board · Submission · Portfolio · Account. The camera opens only for SCAN QR.
- Firebase console → project blacklens2 → Firestore Database → Rules.
- Paste the whole firestore.rules from the project folder → Publish.
- The file is the source of truth; the console is where it runs — a change does nothing until it is published.
ADMIN_EMAILS in js/config.js + adminEmails() in firestore.rules (+ the two server lists) — then publish.
SETTINGS → Access: name, region, companies. No redeploy.
The admin’s alone. Agents trash; the admin restores or deletes for good (DASHBOARD → TRASH).
| Pictures (R2) | DEPLOY.md H · /api/r2?health=1 |
| Customer emails | DEPLOY.md I · /api/mail?health=1 |
| eBay prices | DEPLOY.md C |
| PSA lookup | DEPLOY.md D |
| Price record | Runs every night by itself; CRON_SECRET is optional. |
Orders, jobs, published reports, requests, portfolios (Firestore).
Full-resolution pictures (private) and the report pictures (public), Cloudflare R2.
The working copy of every job and its captures. Deleted jobs wait 30 days in the TRASH; RESTORE FROM RECOVERED FILES rebuilds jobs from recovered browser files.
Address, hours, fees, turnaround, payment, terms for the customers’ requests: BL.config.STUDIO in js/config.js (empty = [BRACKET]).
CENTERING 280 · CORNERS 220 · EDGES 220 · SURFACE 280.
Each pillar is graded 10 → 1 in half points; the card’s GRADE is its lowest pillar — graders do not average.
| 10 | GEM MINT | 9.5 | MINT+ |
| 9 | MINT | 8.5 | NM/MINT+ |
| 8 | NM/MINT | 7.5 | NEAR MINT+ |
| 7 | NEAR MINT | 6.5 | EX/MINT+ |
| 6 | EX/MINT | 5.5 | EXCELLENT+ |
| 5 | EXCELLENT | 4 – 1 | V-GOOD/EX · VERY GOOD · GOOD · POOR |
Never refocus between the two sides — the scale breaks silently.
Auto Align before framing — a skewed edge fakes a centering error.
Dust reads as scratches under magnification; the black bed lets the corners measure cleanly.
Angled light shows whitening and scratches that head-on light hides.
One bad corner caps the pillar; a perfect front with a 65/35 back is not a Black Label.
50/50 front, 60/40 or better back — measured, not eyeballed.
Four flawless tips per side under magnification — no whitening, no soft points.
Not one nick, chip or silver spot on any of the eight edges.
Zero scratches, print lines, dents or clouding — front and back.